Whether you are a designer or a developer, there is nothing worse than an hour or more of investment to limit your figs, just to be presented with long and difficult tasks to convert them into a vibrant code. It may look like a time drain and take you away from the creative process and capture your project. But what if you can automate this process without compromising quality? This is the place where rapid conversion of Figma-to-Flutter code comes. Here in this training we will teach you how to automate this process and to save yourself by manual coding. Whether you are a designer looking for a developer to save a simple workflow or time, this guide will offer direct, practical solutions that can help you translate your fig designs quickly into a flute code. If you follow the right techniques and equipment, your app can immediately live without drowning in the details.
What is Figma?

Figma is the online design tool that guarantees power to the designer to create very nice-looking user interfaces; beautiful mobile apps and attractive websites. Figma has very good collaborative capabilities that enable all designers to dynamically create, share and edit designs in real time, thus making it a great tool for those working in remote teams. This interface further scores points owing to its ease of use, plus some advanced features such as vector networks and prototyping, which elevate the complete design experience. It is in this context that Figma has gained much popularity and has become the preferred choice by designers and developers from different fields.
What is Flutter?

Flutter is a framework for open-source application development designed by Google to develop high-performance, visually attractive and originally collected applications for multiple platforms from a single code base. It facilitates hot reloads so that developers can immediately look at the changes made to the equipment or emulator without rebuilding the entire app. This causes the development and relapse and fine-tuning of design to track quickly. Customized widgets, content design and Cupertino support Ui designers give designers the freedom to create terrible user interfaces that can be compatible with different screen sizes and tilt.
How to Convert Figma to Flutter Code With Flutter Builder
Flutter Builder is a formidable instrument that simplifies the process of translating Figma designs into Flutter code. Its seamless design and simple workflow enable designers to easily create clean and organized code for their UI designs with reduced time and effort in manual coding.
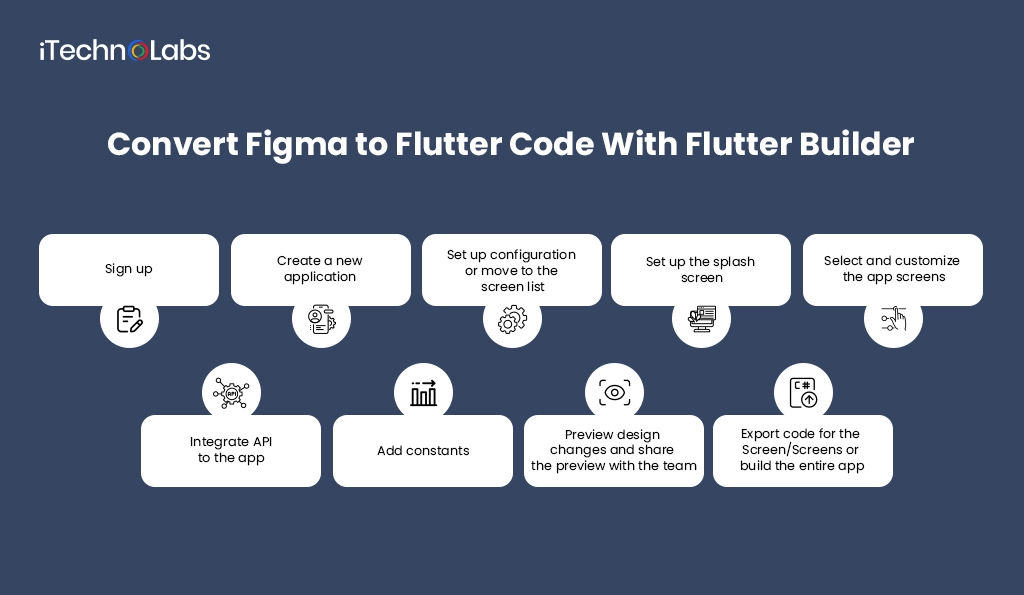
Step 1: Sign up
As the first step in unlocking the power of the Flutter Builder, registration is the place to begin. The simple registration process guarantees users a hassle-free experience. It is as easy as going to the official site and finding the clearly visible “Sign Up” button with ease. From here, you have two easy options: signing up via your email address or even through your Google account. The objective is to give you the greatest flexibility and convenience to meet your individual tastes and requirements. Savor the freedom of selecting the mode that best suits you, as we take care of your satisfaction at every step.
Step 2: Create a new application
After successfully creating your account and signing in, you will encounter a more user-friendly interface shortly. To create a new application, go to this one—the visible “New Application” button is situated in the upper right-hand corner. When clicked, you would right away be ushered to a nice and clear canvas that has all the configurations and layouts you might find handy to illustrate your creative vision.
And now, to simply export your designs with ease, the site has the easy feature of “Import Design.” You can, within a few steps, simply import your Figma design file onto the canvas within seconds. This prevents you from spending minutes redoing your design all over again from the start, losing precious time and effort.
Step 3: Set up configuration or move to the screen list
After successfully importing your design, you have the option of configuring your import settings to suit your own requirements. These range from choosing the target screen size, tailoring text styles and colors, and specifying the level of responsiveness you prefer for your design. Alternatively, if the default settings work for you, just click on “Done” and proceed to the next step.
In case you ever want to go back and edit your design, the builder has you covered with its “Screen List” feature. You can quickly move around and edit every screen of your design without having to redo the entire thing from scratch. Additionally, the platform also offers you a variety of strong tools and features like layers, grouping, and alignment options, so you have complete control over your design.
Step 4: Configure the splash screen
Secondly, as you design your app, you can choose to augment its usability through the addition of an engaging splash screen. A splash screen is the first visual impression, making a lasting memory for users. The platform enables you to easily customize the design and timing of your splash screen, providing a wide variety of choices from which to select. In this manner, you can design an authentic and interactive opening experience for your app users.
Step 5: Choose and personalize the app screens
Having properly set up your screens and splash screen, it is now time to select your screens well and personalize the respective screens of your application. Through the easy-to-use and intuitive interface, you can easily browse through the lineup of screens and easily make adjustments. The platform has a very rich set of customization features, giving you the freedom to insert widgets, tweak layouts, try colors and fonts, and a whole lot more. These rich possibilities for customization give you the guarantee that you will be able to bring your Figma design to life and build a complete, fully working app that beautifully reflects your original idea, enticing users and leaving them with an enduring impression.
Step 6: Integrate API to the app
APIs embedded into your application do not demand any additional hardcoded APIs. Its feature simplifies processes and saves time, which is invaluable to your focusing on other critical areas of your application’s development. Such an ease allows you to incorporate into your application external data sources like databases or social media platforms smoothly. This connection allows you to show dynamic and up-to-date content, thus enhancing user experience and making it different from other applications across the digital landscape.
Step 7: Add constants
Constants will help to maintain consistency in your app such that everything from colors, fonts, and spacing will not change all over. Updating all of these constants from a single place will keep a consistent design throughout your app without much effort.
Step 8: Preview design changes and share the preview with the team
One of its most effective and strongest features is its unbelievable ability to live preview design changes and provide you with a seamless experience. Not only do you have the ease of sharing the changes with your team easily, but you also receive useful feedback and alter accordingly in a snap so that everyone stays on the same page. By streamlining the feedback process, the builder saves your time and protects you from any confusion, allowing you to concentrate on what’s most important—designing great stuff that impresses.
Step 9: Export code for the Screen/Screens or build the entire app
Now that you are done with your design and changes, it’s time to export the code. With Flutter Builder, you can export Flutter code of screens or whole apps with just one click. That certainly saves your time and effort and lets you concentrate on other important things in your entire app development process.
Benefits of Converting Figma Design to Flutter Code
Converting the Figma design to a Flutter code provides many benefits that can streamline the app development process, improve the team’s productivity and ensure platform stability. By integrating design and development, teams can go towards execution with quick and minor errors.
1. Time-Saving
Translating Figma designs to Flutter code saves a huge amount of time on hands-on front-end coding. Rather than rewriting every element line-by-line in code, the process transcodes UI generation from the design file. This makes it possible for developers to concentrate on business logic and functionality rather than tedious UI implementation, accelerating delivery timelines without any compromise on design.
2. Enhanced Efficiency
To translate figs for Flutter code saves huge amounts of time on front coding on your hands. Instead of entering each line of item in the code, the process draws on the UI generation from the design file. This allows developers to focus on business logic and functionality instead of Teduned UI implementation, and accelerates the timeline of the distribution without any agreement on the design agreement.
3. Design Consistency
When the design is translated by hand in the code, incomponity creeps color deviation, padding error or wrong font sizes. Translation of Fiken guarantees directly flute that the final product reflects the original design with accuracy. This stability improves brand identity and guarantees an integrated, sophisticated user experience in each screen and device.
4. Increased Collaboration
Closing the design-to-development gap facilitates Figure-to-Floater Conversion Equipment Better Collaboration. Designers are able to move the right assets, and the developers get a clean code to be used. It eliminates communication back and forth, reduces misconceptions and enables cross-functional teams to work in harmony, resulting in rapid and even project distribution.
5. Cross-Platform Compatibility
The pulsation is known for its nature across platforms. Through the process of translating the Figma design into a Flutter code, the same user interface can be released on both iOS and Android without developing separately. It makes maintenance easier, cuts costs and gives users a smooth experience despite the platform they are on.
6. Customization & Flexibility
Although tools for conversion create the initial layout, developers have complete control of the code. They can make changes to layouts, implement animations, or add third-party packages whenever necessary. This gives it an easy ability to develop on top of the auto-generated codebase and customize the app to fit intricate needs or changing user demands.
Also, read: VPN App Development: A Detail Guide
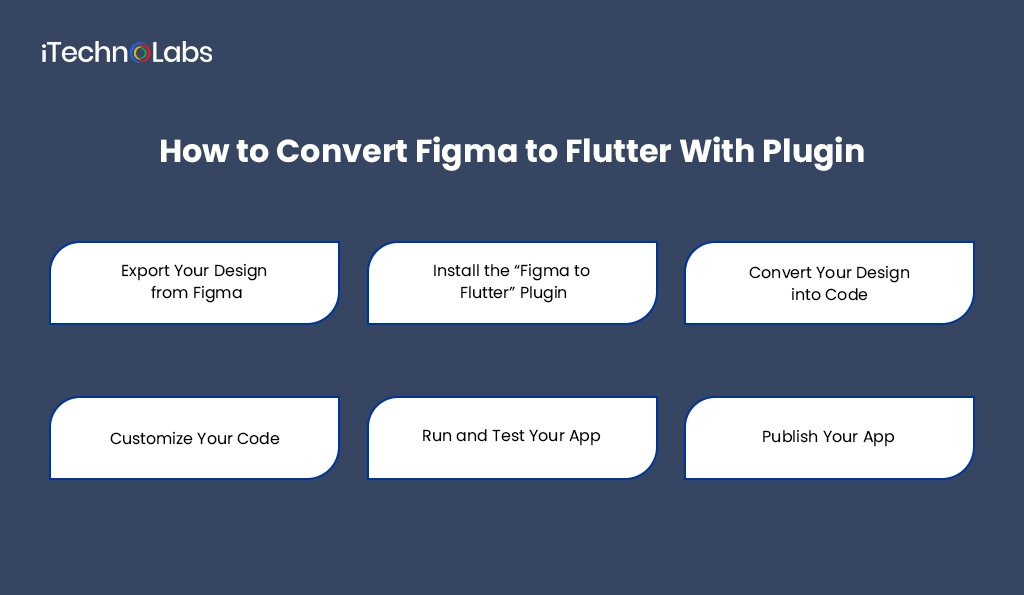
How to Convert Figma to Flutter With Plugin
Converting Figma designs to Flutter code is now easier than ever with the right tools. Here’s a simple, step-by-step guide using the “Figma to Flutter” plugin.
Step 1: Export Your Design from Figma
First off, you will need to export your design from Figma into a format compatible with Flutter. The most recommended format would be SVG (Scalable Vector Graphics) since it has very good scalability and picture quality.
Step 2: Install the “Figma to Flutter” Plugin
Next, you will need to install the plugin “Figma to Flutter” in your Figma account. This plugin allows you to generate code for your design elements from within Figma, which will make the process much simpler.
Step 3: Convert Your Design into Code
Once the plugin is added, choose your design elements that you need to convert and tap on “Export” at the bottom right-hand corner of Figma. The plugin will produce a Flutter project with all of the code necessary for your design.
Step 4: Customize Your Code
The auto-generated code may not be as good as possible, so take some time and go through, making any corrections needed to preserve the functionality and looks of your app.
Step 5: Run and Test Your App
The coding is over; run your app on the simulator or real device, and get to see how it works and what it looks like. You can also hot reload your application to try any further changes immediately. After seeing all the results, when you feel okay with your app, you can release it onto the Google Play Store or even the Apple App Store if you are using these platforms.
Best Figma to Flutter Plugins and Tools
It has never been easier to turn Figma designs into Flutter code, thanks to a number of robust plugins and tools that now exist. They enable designers and developers to collaborate without any hitches, boosting efficiency and guaranteeing consistency between the design and the actual app. These are some of the best Figma to Flutter plugins and tools to help streamline your development process:
-
Figma to Flutter (F2F) Plugin
This plugin will automatically translate Figma designs into neat Flutter code. It creates Flutter widgets that mirror the design elements, enabling developers to easily integrate them into the app. The tool provides customization features, so you can modify the generated code based on your project requirements.
-
FlutterFlow
FlutterFlow is a no-code app that enables you to design visually and create Flutter apps. Import your Figma designs and enhance them further, then export the Flutter code. It’s a great tool if you prefer concentrating on creating functionality while leveraging available designs without excessive coding.
-
Supernova Studio
Supernova Studio is another great tool that closes the loop between Figma and Flutter. It automatically translates Figma designs into high-quality Flutter code alongside features such as design-to-code syncing and live collaboration. The integration of Supernova with Figma means that it’s a good fit for teams engaged in sophisticated projects.
-
Figmify
Figmify is a plugin that converts your Figma UI designs into production code for Flutter. It generates themes, layouts, and components along with ensuring the Flutter output is very close to the Figma design in spacing, fonts, and colors. It’s an excellent choice to get the job done efficiently with no loss of quality.
-
Figma Flutter Generator
This plugin enables users to automatically translate their Figma designs into Flutter code. Text styles, colors, and other design properties are supported by the plugin. providing a smooth path from design to Flutter code. The code can be further personalized to be suitable for the development environment, thus making it a versatile tool for developers.
-
ProtoPie
Although there is no connection with Figma, the protopia supports the construction of interactive prototypes, which can later be exported to pulsation. This means that this can be an ideal solution for those who want to introduce developers with an interactive design Mockup, so that collaboration and concept can be disseminated more efficiently than before.
Suggested Article: eSIM Platform Development: Key Steps & Business Potential
Benefits of Using Figma to Flutter Conversion Tools
Figma-to-Flutter conversion tools have greatly improved the way mobile apps are designed and implemented by developers. With the capability of converting Figma design files into Flutter code directly, such tools simplify the development process and present a number of benefits for both developers and designers. Here are the most important advantages of using Figma to Flutter conversion tools:
-
Faster Development Process
Figma is indeed a powerful design application for the creation of user interfaces (UI). By converting Figma designs to Flutter code using a conversion tool, developers would save time as opposed to manually coding every UI element. So it automates the conversion of design components—buttons, text fields, layout structures, etc.- use within Flutter’s widget-based system, which speeds up app development and minimization of human error.
-
Consistency in Design and Code
The biggest problem when developing the application is to keep the design and the final code really consistent. The Figma-to-Floors Conversion Tool will help ensure that each element of the design is reproduced accurately in the application because it is in the design, including vacancy, color, typography and dimensions. Thus, they help reduce the gap between the design and finally what is used so that the user experience becomes more polished and consistent.
-
Efficient Collaboration
Integration amongst builders and designers is smoother thru Figma to Flutter conversion software program. Designers are capable of broadening and revising UI elements the usage of Figma, whereas builders have the capacity to directly translate designs into Flutter code. This allows in decreasing round-journey interactions and allows the development crew to paint parallel to each other, therefore shortening challenge timelines while boosting productivity.
-
Cross-Platform Compatibility
The pulsation is known for developing applications for both Android and iOS from a code base. Figma-to-Flutter-Informer Tools ensure that design is converted to flags that are easily run on different platforms. It extends with the requirement for platform-specific designs, which protect both time and effort when developing applications for different operating systems.
-
Better Design-Development Workflow
The process of conversion bridges the gap between development and design, ensuring that the workflow is smoother. By directly converting designs created in Figma into Flutter code, the time of developers can be saved from translating design to code. This increases efficiency and allows for a more agile development process.
-
Cost-Effective
By saving time on hand coding and revision requirements because of design inconsistencies, Figma-to-Flutter converters end up being cost-saving in the long term. The efficiency of implementing designs into Flutter rapidly guarantees quicker completion of projects, which can translate to a large cost savings for companies.
Are you looking to convert your Figma design to Flutter code?
Conclusion:
Translation of fig design for Flutter code is not only a technical process, but also the ability to make app development more efficient and improve the user experience. Developers can save time, maintain the stability between design and code, and create smooth applications across platforms by using Figma to flag for conversion units. The process eliminates manual coding, even collaboration between developers and designers, and speeds up the entire growth cycle. In addition, design components can be translated directly to the flute code, which means that the final product remains loyal to the intentions of the first design below being more effective. Current fast-fast app development in landscape, using such a tool is a very large plus, resulting in high-quality, user-friendly apps that achieve skill in the competing market.
Also read: POS System Requirements Specification & Checklist For 2025
FAQs
1. Can you convert Figma to Flutter?
Yes, fig design can be converted to different plugins and tools, such as Figure (F2F) and Supernova Studio. These devices help generate vibrant codes from your designs, streamline the growth process and ensure a spontaneous transition from design to the app.
2. Does Figma generate Dart code?
No, Figma does not generate direct Dart code. However, tools such as Figma or Equipment such as Flutterflow, you can convert the Figma design to a flatter-compressing Dart code, making it easier for developers to use the design on the Flutter app.
3. Can I convert Figma to code?
To import icons from Figma to the Flutter, you can export your icon from Figma as SVG files and use the Flutter_SVG package to reproduce them in your Flutter app. Alternatively, FIG plugins such as “Figma to Flute” can change and generate the vibrant code required directly for the icon.
4. Can we convert Figma design to FlutterFlow?
Yes, Figma design can be imported into flutterflow. With its FIG integration, you can convert your design to Flutterflow so you can optimize your app visually, generate flute codes and start your app without extensive manual coding.
5. Which is better, Figma or Flutter?
Figs and pulses serve different goals. Figma is a design tool used for Ui/UX design, while the flute is a growth structure used to produce apps. It is necessary to design the Figma interface, while the vibrations are important to convert these designs into an app across platforms. Both equipment apps complement each other in the app development process.
6. How to import icons from Figma to Flutter?
To import icons from Figma to Flutter, you can export your icons as SVG files from Figma and use the flutter_svg package to render them in your Flutter app. Alternatively, Figma plugins like “Figma to Flutter” can directly convert and generate the necessary Flutter code for icons.
7. Is it possible to convert Figma to Flutter?
Yes, it is possible to convert Figma designs to Flutter using plugins and tools like Figma to Flutter, FlutterFlow, and Supernova. These tools help developers quickly convert design files into Flutter code, speeding up the development process and ensuring design consistency.
8. Can Figma be used with Flutter?
Yes, figure can be used with pulsation. Designers make Ui/UX in Figma, and developers can then convert these designs to the Flutter code using plugins or tools. This collaboration ensures a smooth transition from design to development, which makes the process more efficient and harmonious.