Developing applications across multiple platforms offers virtually limitless advantages and allows significant savings over time through the unified codebase. The ability to manage an Android and iOS app and the friction points that come along with that can be very challenging. Cross-platform open-source frameworks like Flutter will alleviate pain points seamlessly and without adverse impacts on the mobile application performance.
Flutter is used by over 46% of global developers for cross-platform development. Flutter is backed by Google and supports iOS, Android, mobile, and desktop from a single codebase. To date, more than 1 million mobile apps have been built using Flutter. You can’t ignore this big market share and the rising popularity of Flutter and iOS development.
But what about the existing mobile apps? How do you convert existing apps to Flutter?
Yes, converting your existing apps to Flutter is totally possible. However, it is wise to fully convert them to ensure the transition is smooth and does not disrupt the app experience.
If you have an APK file, there could be some complications. You must know that APK is not the original code. With this, the layout, screen designs, and how the app behaves—none of them are clear. To rebuild, we have to redesign everything in Flutter from scratch. It means more time and effort.
So, here we are with a complete guide on converting your existing mobile apps to Flutter without impacting the functionality of the app.
We have divided the whole process of existing mobile app to Flutter conversion into four parts:
- Preparing the migration to Flutter
- Code Migration
- App Testing and Optimizing
- Deployment
But before we jump right on how to convert an app to Flutter, let’s first understand the benefits of doing so.
Benefits of Converting Existing Apps to Flutter?
Developers are increasingly converting existing apps to Flutter to unlock a range of benefits. Here are some of the advantages of using Flutter for existing app migration (what is an application migration?):
Cross-Platform Compatibility
As it’s already known, Flutter lets you run a single codebase across multiple platforms, be it Android, iOS, or web. This accounts for better compatibility and possesses no limitations upon integrations with different operating systems. Also, this makes testing easier and quicker!
Google Firebase Collaboration
Flutter can work compatibly with Google Firebase. This empowers developers to develop high-performance mobile apps in a fraction of the time. This compatibility also allows access to backend services that too with complete authentication, hosting, database management, and storage!
Faster Development, too.
Flutter offers a ‘hot reload’ feature, allowing developers to instantly view any changes. It doesn’t require them to restart the app, unlike the native platforms. This speeds up the development process, letting them do faster iterations and bug fixes.
High Performance
Apps developers in Flutter (cross-platform) are comparatively high-performing than the native ones. This is due to the fact that Flutter apps are compiled to native ARM code. This helps with load time and a better user experience.
For more information on how to convert Java-based apps into Flutter, please take a look at our blog on Trending Mobile and Web Applications Built on Java.
Growing Community Support
With the Flutter developer community growing speedily, you can benefit from continuous updates, extensive libraries, rich documentation, and a lot more. All these help you develop efficient and scalable apps and also in app scaling.
Steps To Migrate Existing Mobile App To Flutter
Now that you know the many benefits of app migration to Flutter, let’s dig into the process. We have discussed a general overview of app migration. The process, however, may vary slightly depending on which platform/technology your app is currently developed in.
Preparing The Migration To Flutter
Before migrating or converting, it’s best to learn about the cross-platform framework first. Flutter is an open-source UI toolkit developed by Google to help developers build apps that natively compile to multiplatform. So by employing a single codebase.
Explore the widgets, features and tools that the Flutter framework offers so that you can perform the migration efficiently and smoothly.
Next, analyze your existing app. Start with reviewing the architecture, characteristics, and performance of your current app. You should also determine what functions are core to the app, what platform-specific dependencies there are and any third-party integrations that may impede customization or rework for Flutter. Finally, take a good look at the UI/UX design to see how close you can get to it using Flutter’s widget structure.
The idea is to prepare the setup for the upcoming migration so that you don’t get into trouble or loopholes at the later stages.
Let’s understand this with the example of converting Ionic apps to Flutter.
You would want to start with the existing application architecture and its important components. Ionic uses HTML, CSS, and JavaScript for UI and WebView for rendering, but Flutter uses Dart and a native search engine. Next, you should analyze UI elements built with Ionic’s UI components and translate them into Flutter’s widget tree system. Moreover, if you have used any plugins like Cordova while developing your Ionic app, you must replace them with equivalent Flutter plugins.
Code Migration
The most important first step is converting an existing application into Flutter. To start, you will want to create a project in Flutter using the Flutter SDK. This is basically the shell or framework in which to migrate your code into Flutter.
Next is to migrate your code and data layer, which involves converting the existing UI, business logic, and data layer from the existing app framework to Flutter’s Dart language. This may include rewriting state management solutions, custom components, and API integration.
Finally, you will have to write code that is specific to the platform. You will have to deal with any platform-specific functionality by using either Flutter’s platform-specific code or by using platform channels in Flutter to make your app work on either Android or/or iOS.
For instance, you must port an iOS application developed previously in Objective-C or Swift to Flutter. Code migration involves translating the code to Dart and handling iOS-specific features using Flutter’s platform channels. For instance, if your application used Core Data integrations or native iOS views, you would need to bridge or re-implement them.
Likewise, for the conversion of Kotlin to Flutter for Android apps, you would have code based on Kotlin and would translate it to Dart. Features related to Android in Kotlin, like Kotlin Coroutines and Room Database usage, need to be managed with the same Flutter packages or by implementing custom platform channels. When porting over from an Android app to Flutter, this involves importing the user interface, class-based business structures, and features specific to the platform into Flutter and harmoniously working within Flutter’s mobile app environment. For instance, to support push notifications on Android, you will need to add the Flutter notification plugin, setting it up to receive and handle native notifications.
App Testing and Optimizing
After you have ported the code from your current application successfully into Flutter, you will need to test and optimize the Flutter application.
Testing confirms that the application that has been migrated works as expected on every platform. This includes unit testing for the purpose of validating individual components and widget testing for proper functionality of UI components. It also involves integration testing to check whether different components of the app work well together.
As an example, during the conversion of Angular to Flutter, you shall have to migrate existing Angular unit tests that are written in Jasmine to Dart unit tests with Flutter’s testing library.
App optimization is nothing but improving the performance and responsiveness of the converted app. This involves profiling the app to identify performance bottlenecks, code optimization, and optimizing resource utilization.
With an Angular application reliant heavily on the change detection feature of Angular, you would have to leverage Flutter’s widget rebuild optimization mechanism and apply tools like Flutter DevTools to enhance performance.
You will be able to deliver a smooth and responsive user interface for the Flutter-migrated application by detecting and debugging performance issues like memory leaks or slow rendering.
Deployment
This last stage of migrating the current app to Flutter requires meticulous preparation and planning. Initially, you will have to prepare for release by making sure that the Flutter app is well tested and optimized. Additionally, think of setting up build settings for both platforms, such as app icons, splash screens, and permissions.
After preparations are complete, actual deployment is initiated. It is about creating build files for release. To deploy for iOS, that will mean creating an Xcode archive and sending it to the App Store. In the situation of the Android platform, creating an APK or AAB file for upload to the Google Play Store will be necessary.
Accordingly, for a successful deployment, app store integration and store-specific management will be very important.
For the React Native to Flutter conversion, deployment is a three-step process involving the setup of the Flutter build environment, the React Native components to Flutter widgets conversion, and the final step of app submission to the app stores in a platform-oriented manner.
Watch this video on how to convert your existing mobile application to Flutter seamlessly. This video will cover the main steps, benefits, and best practices to transition successfully.
For a more detailed overview of Flutter development, refer to our Complete Guide to Flutter App Development Services.
Now, let’s get into the process of migration of some common app platforms to Flutter.
1. Convert Android App to Flutter
1. Setup Tools
- Install Flutter SDK + IDE.
- Run flutter doctor.
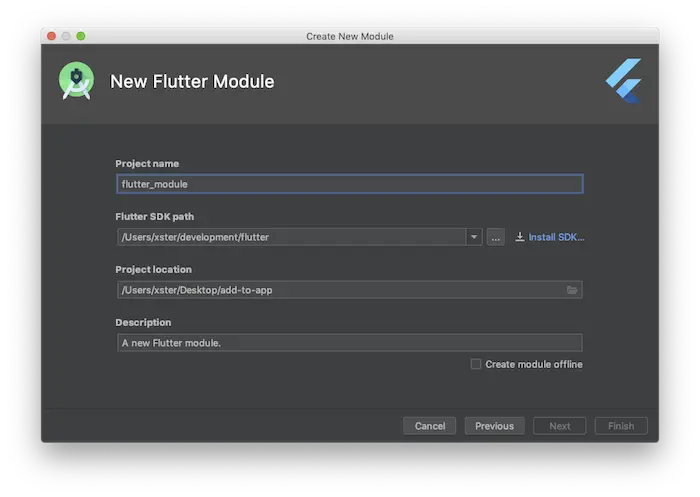
2. Create Module
- Open your Android project.
- Add a Flutter module (File > New > Module > Flutter).
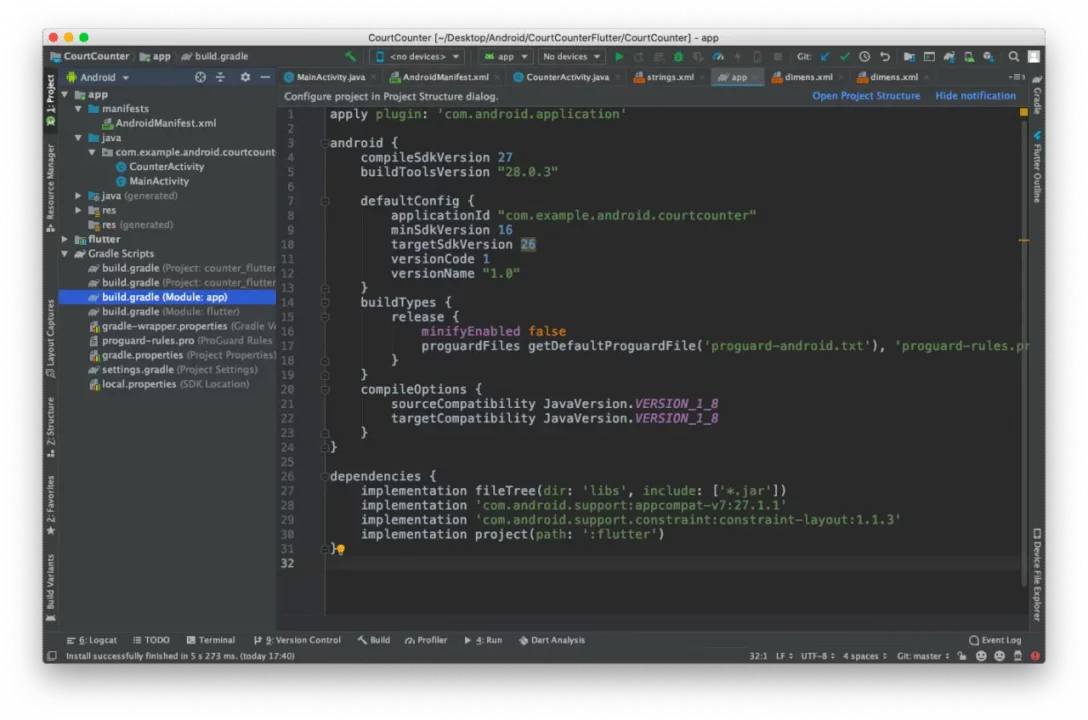
3. Link Flutter to Android
- Update settings.gradle + app/build.gradle.
- Use FlutterActivity to launch Flutter screens.
4. Move Code
- Rewrite UI with Flutter widgets.
- Convert logic to Dart.
5. Run
- For integration: Build an Android app.
- For a full app: flutter run.
6. Hot Reload
- Run flutter attach in terminal → Press r/R.
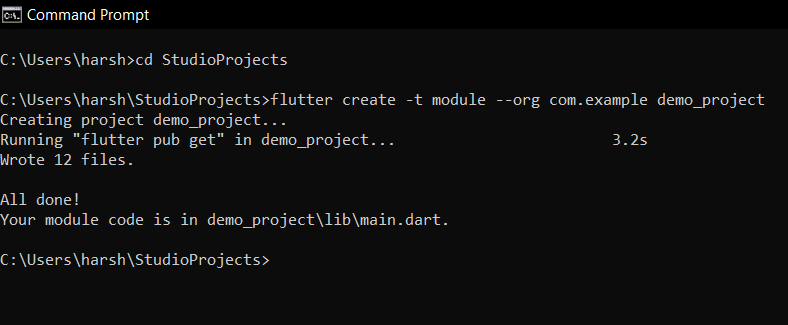
Android apps can be moved to Flutter to make them more stable, fast, and performance-efficient. To initiate this process, the foremost step is to convert the Android app to Flutter. Do this carefully, as this module will be responsible for the app’s user interface in later steps.
To create a separate code from the Flutter code, use the command create-T in Flutter. This command will execute a new project with a different structure, helping to convert Android to Flutter more efficiently.
2. Convert iOS App to Flutter

Converting an iOS app to Flutter is almost similar to converting an Android app.
- Open an existing project.
- Open your iOS project in Xcode.
- Create Flutter Module
- Install CocoaPods
- Integrate Flutter into iOS
- In your iOS project’s Podfile:
- Run:
- Use Flutter iOS APIs
- Launch Flutter in ViewController.swift:
- Build & Run
- Build your iOS app in Xcode (⌘ + R).
- Hot Reload
Moving from an iOS app to Flutter gives optimal app performance, provides a single UI builder, and speeds up the development cycle. By converting an iOS app into Flutter, development teams end up with a unified codebase for both iOS and other platforms, reducing time and effort for maintenance, delivering continuity between platforms for end users, easier updates, increased stability, and cross-platform reliability.
3. Java to Flutter converter
1. Environment Setup
- Install Flutter SDK
- Install Android Studio/Xcode + necessary plugins
- Configure IDE (Android Studio/VSCode)
- Verify setup with Flutter Doctor.
2. Project Creation
- flutter create –org com.yourcompany your_app_name
- Choose appropriate project structure (package organization)
- Set up platform-specific configurations (iOS/Android)
3. Existing App Analysis
- Document Java app’s architecture
- Identify core UI components and navigation flow
- Map Java features to Flutter equivalents
- Plan state management strategy (Provider, Bloc, Riverpod, etc.)
4. UI Implementation
- Create widget hierarchy matching Java layout
- Implement adaptive design for both platforms
- Add platform-specific theming (Material/Cupertino)
- Set up navigation (GoRouter, Navigator 2.0)
5. Business Logic Conversion
- Port Java logic to Dart with null safety
- Implement state management
- Add error handling
- Set up dependency injection (get_it, injectable)
6. Data Layer Implementation
- Network layer (Retrofit → Dio conversion)
- Local storage (SharedPreferences/SharedPreferences → Hive/Isar)
- Database (SQLite → Floor/SqfEntity)
- File storage integration
7. Testing Strategy
- Unit tests for business logic
- Widget tests for UI components
- Integration tests for critical flows
- Golden tests for UI consistency
- Continuous testing throughout development
8. Optimization & Refactoring
- Performance profiling (DevTools)
- Internationalization (i18n/l10n)
- Accessibility improvements
- Code splitting/modularization
- Linting/Static analysis
9. Platform Integration
- Native interop (platform channels)
- Platform-specific permissions
- App lifecycle handling
- Deep linking configuration
10. Deployment Preparation
- App icons/launchers for both platforms
- Version management (pubspec.yaml)
- App signing setup
- Proguard/R8 configuration (Android)
- App Store Connect preparation (iOS)
11. Release & Monitoring
- Build app bundles/APK/IPA
- Deploy to stores (Play Store/App Store)
- Implement crash reporting (Firebase Crashlytics/Sentry)
- Set up analytics (Google Analytics/Mixpanel)
- Monitor performance metrics
Utilizing a Java to Flutter converter can help streamline the entire process by automating parts of the code migration process, but a manual code inspection and adjustment is often required to ensure performance and Flutter best practices. A migration from Java to Flutter enhances experience in modern, cross-platform application development through superior UI, structure, and performance.
4. Convert APK To Flutter Code
Transforming an APK to Flutter is difficult, since APKs are compiled binaries, not source code files. Still, it is possible to reverse engineer to reveal more information about the APK parts, which will give us a structure to refer to when we can rewrite the app in Flutter.
Here are the quick steps:
- Decompile the APK file.
- Extract resources from the APK.
- Use Bytecode Viewer or JADX to decompile the APK and view the Java/Kotlin code.
- Rewrite the app in Flutter.
- Test and refine.
Check out our detailed guide on how to convert APK to Flutter code for more understanding of the process and its intricacies.
5. Angular to Flutter Converter
- Set up the Flutter environment
- Install the Flutter SDK from the official website.
- Set up an IDE like VS Code or Android Studio with Flutter and Dart plugins.
- Run a Flutter doctor to verify the setup and resolve any issues.
- Configure an emulator (Android/iOS) or connect a physical device for testing.
- Create a new Flutter project
- Open a terminal and run.
- Navigate into the project folder.
- Open the project in your preferred IDE and run the default app to verify the setup.
- Convert Angular UI (HTML/CSS) to Flutter widgets
- Analyze the Angular component structure and identify reusable UI components.
- Convert HTML elements into Flutter widgets (e.g., div → Container, button → ElevatedButton).
- Translate CSS styles into Flutter’s BoxDecoration, TextStyle, Padding, etc.
- Handle responsive design using MediaQuery or LayoutBuilder.
- Replace Angular Material or Bootstrap components with Flutter alternatives like Material or Cupertino widgets.
- Implement a state management solution
- Choose a state management approach (e.g., Provider, Riverpod, Bloc, GetX, or MobX).
- Set up a central state management file or class.
- Replace Angular’s RxJS, Services, and Observables with appropriate Dart solutions (e.g., Streams, ChangeNotifier, FutureBuilder).
- Ensure data flow and UI updates work smoothly across the app.
- Convert TypeScript/JavaScript business logic to Dart
- Identify and rewrite Angular services and controllers in Dart.
- Convert TypeScript interfaces and classes into Dart models using the class keyword.
- Replace Promises and async/await functions with Dart’s Future and async/await.
- Translate Angular decorators (@Input(), @Output(), etc.) into Flutter patterns (e.g., passing data via constructors and callbacks).
- Implement dependency injection using GetIt or other service locators.
- Integrate APIs and services
- Install necessary Flutter dependencies using
- Replace Angular’s HttpClient service with http or dio in Dart.
- Handle API calls using Future and async/await
- Implement error handling, caching, and authentication (OAuth, JWT, Firebase, etc.).
- Implement navigation and routing
- Replace Angular’s Router (RouterModule) with Flutter’s Navigator and GoRouter.
- Define routes using
- Ensure smooth transitions and deep linking support.
- Add animations and UI enhancements
- Replace Angular animations (@animate) with Flutter’s AnimationController and Hero transitions.
- Use packages like flutter_animate or Rive for advanced animations.
- Test the Flutter app
- Write unit tests for business logic using flutter_test.
- Implement widget tests to verify UI components.
- Use integration_test for end-to-end testing.
- Debug and optimize performance using Flutter DevTools.
- Build and deploy
- Generate app builds for Android and iOS:
- Configure CI/CD pipelines using Codemagic, GitHub Actions, or Bitrise.
- Publish the app on the Google Play Store and Apple App Store following their respective guidelines.
Using an Angular to Flutter converter can assist in transforming UI components and business logic efficiently. While automated tools may help, manual refinements are necessary to align with Flutter’s architecture and ensure optimal performance. Migrating from Angular to Flutter enables cross-platform compatibility with a more native-like experience.
6. Convert React Native to Flutter
- Install the Flutter SDK and set up the Flutter IDE.
- Create a new Flutter project using the ‘Flutter create project_name.’
- Convert React Native UI components (like View, Text, and Image) to Flutter widgets (like Container, Image, and Text).
- Translate React navigation for Flutter’s navigation system.
- Convert Redux or Context API (React business logic) to Flutter’s state management solution.
- Translate networking and API calls to Dart’s http package or other Flutter libraries.
- Test and deploy.
When you convert React Native to Flutter, it’s essential to carefully migrate UI components and business logic while ensuring Flutter-specific optimizations. This transition allows for improved performance, native-like experiences, and better maintainability across multiple platforms.
7. Ionic To Flutter Converter
To convert Ionic apps to Flutter,
- Set up the Flutter IDE
- Recreate Ionic UI in Flutter
- Migrate Ionic business logic to that of Flutter
- Replace Ionic plugins with equivalent Flutter plugins using pub.dev.
- Test and deploy.
8. Kotlin to Flutter Converter
Here are the steps for the Kotlin-to-Flutter converter:
- Set up the Flutter environment— Install Flutter SDK and configure an IDE like Android Studio or VS Code.
- Create a new Flutter project—run flutter create project_name and open it in your IDE.
- Convert UI components—replace Android XML layouts with equivalent Flutter widgets.
- Migrate business logic—rewrite Kotlin classes and functions in Dart.
- Replace Kotlin-specific features. – Adapt platform-specific code using Flutter plugins or native channels.
- Test and deploy—Run unit and UI tests, then build and publish the app.
The similar process can be used for Swift to Flutter Converter as well.
Using a Kotlin-to-Flutter converter can simplify the migration process by automating some aspects of UI and logic translation. However, manual adjustments are often required to ensure the best performance and seamless integration with Flutter’s framework. Transitioning from Kotlin to Flutter allows for better cross-platform compatibility and a more dynamic user experience.
The Swift to Flutter converter follows a similar approach, replacing Swift-specific functionalities with Dart equivalents to ensure a smooth migration.
Also, read: How to Convert Figma-to-Flutter Code Quickly?
How to Integrate a Flutter Module into Your Existing App?
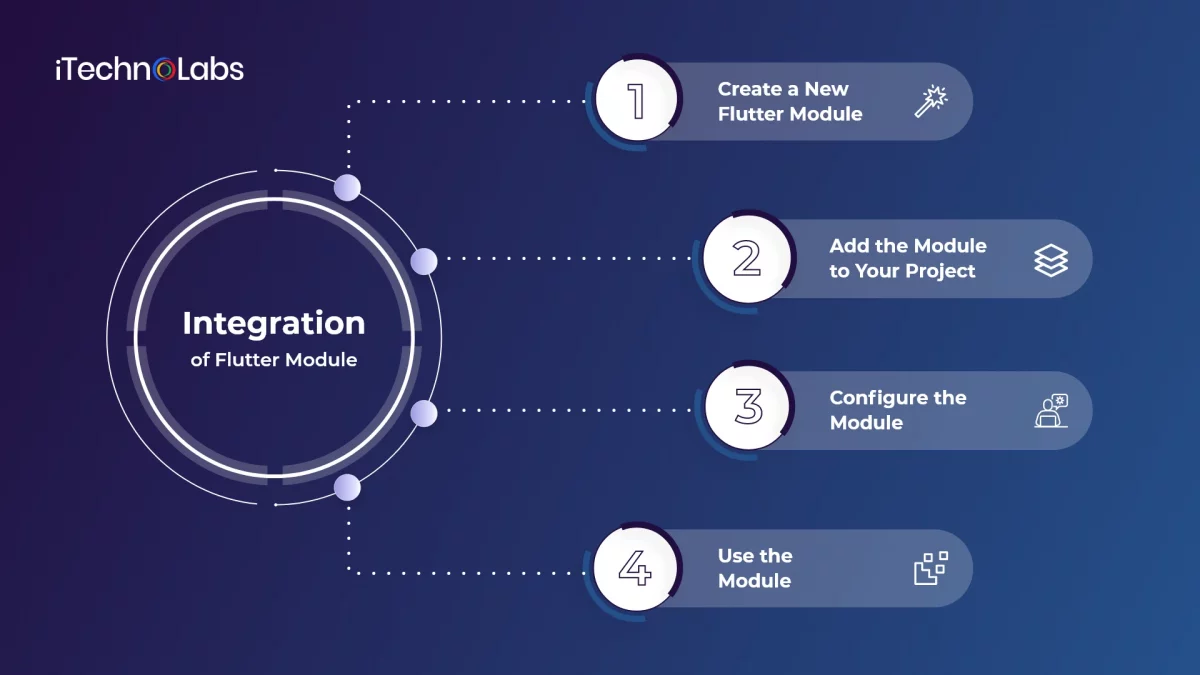
To integrate a Flutter module into an existing Android or iOS project, you’ll need to follow a few steps:
1. Create A New Flutter Module
Use the flutter_create command to create a new Flutter module. This will create a new Flutter project that can be used as a module in your existing project.
2. Add the module to your project
To achieve this, add your new project as a dependency. In the Android platform, add the module as a subproject. For this, go to project “Settings” and select the “gradle” file. Now, add the module as a dependency in your project’s “build gradle” file.
In the case of iOS, add the module as a dependency in your project’s ‘Podfile.’
3. Configure the module
After you have added the module to your project, configure it to work with your existing project. You will need to configure things like the module’s linking to native code, build settings, and configuring the module’s entry point.
4. Use the module
Finally, to use the module in your project, call its APIs from your native code. This way, you will be able to leverage the functionality of the Flutter module in your existing project.
Note: The exact steps for integrating a Flutter module will depend on your specific project and the modules you’re working with. It is suggested that you refer to the documentation for your specific module and platform to ensure you follow the correct steps.
The Final Words
Mobile app development can be challenging. However, with the right tools and technologies, you can minimize the challenges. And Flutter is one such tool! Migrating your existing app to Flutter can greatly enhance performance, reduce development time, and simplify the management of both iOS and Android apps.
By following the above-discussed steps, we hope you will be able to make a smooth transition from your existing app to Flutter. Your journey to efficient conversion of mobile app development using Flutter begins here!
For additional insights into why Flutter might be a suitable choice for your audience, check out our blog on Choosing Flutter for App Development. If you’re interested in the advantages of using Flutter for app development, refer to Why Flutter App Development is the Right Choice.
For readers considering hiring external help for the conversion process, our Guide to Outsourcing Flutter App Development may be valuable.
Additionally, you can explore 15 absolute Dart and Flutter packages to discover useful packages that can facilitate your app conversion.
Important article: An Ultimate Guide to Flutter Super App Development
Frequently Asked Questions
1. Why Migrate to Flutter?
Migrating to Flutter offers several advantages, such as
- Faster development due to hot reload.
- Better performance than traditional hybrid frameworks.
- Cost savings by maintaining a single codebase for iOS, Android, and web.
- Simplified migration from native app to Flutter, whether it’s Kotlin to Flutter, Swift to Flutter, or React Native to Flutter.
2. How to convert an iOS app to Flutter?
Flutter provides multiple ways to convert an iOS app to Flutter, enabling seamless migration from Objective-C or Swift applications.
- Include a Flutter SDK hook in your CocoaPods along with the Xcode build process to build automatically and then import Flutter into your CocoaPods. Flutter module.
- It lets you build a Flutter module that can be integrated into an iOS framework so that you can incorporate the module into your own build system.
- FlutterEngine API for starting and persisting your Flutter environment independently of attaching a FlutterViewController.
- Flutter works with both Objective-C and Swift-based iOS apps, making it easy to convert Swift to Flutter.
- Let Flutter modules utilize the Flutter plug-ins to communicate with the platform.
- Utilizing the Flutter attach feature using an IDE or command line, users are able to connect to an application that contains Flutter and then investigate it or reload it by using the stateful hot load.
3. How Does Flutter Work on Different Platforms?
Flutter runs on multiple platforms using a single codebase, including
- Android (convert Android app to Flutter)
- iOS (convert iOS app to Flutter)
- Web (build progressive web apps with Flutter)
- Desktop (Windows, macOS, Linux support)
For example, businesses can convert React Native to Flutter or rewrite an app from native to Flutter to support multiple platforms seamlessly.
Check out our detailed blog on React Native vs. Flutter for more information.
4. Flutter vs. React Native: Which One Is Better?
When deciding between Flutter and React Native, consider:
- Performance: Flutter uses Dart for near-native performance, while React Native relies on JavaScript bridges.
- Development Speed: Both support hot reload, but React to Flutter conversion allows access to a richer UI framework.
- UI/UX: Flutter provides a consistent UI across platforms, while React Native relies on native components.
Many businesses look for a React Native to Flutter converter to migrate due to these advantages.
5. Can You Convert Native Apps to Flutter?
Yes, it is possible to convert a native app to Flutter
- Use a single codebase for mobile and web apps.
- Convert existing Flutter mobile apps into web apps.
- Migrate from Angular to Flutter or React to Flutter for a unified experience.
If you’re considering an iOS to Flutter or Android to Flutter transition, you can extend the same app to the web with minimal changes.